Home » 2024 (Page 2)
Yearly Archives: 2024
Why Sealcoating Is a Good Idea For Your Asphalt Parking Lot

Sealcoating is a great way to extend the life of asphalt pavement. It also makes sweeping and cleaning the parking lot easier because it creates a smooth surface.
The process is typically performed from spring through fall. It requires a couple of days of dry, non-rainy weather to allow the seal coat to set properly. Visit https://www.rochesternysealcoating.com/ to learn more.
1. Protection
Sealcoating creates a barrier that keeps water from seeping into and weakening your asphalt. Water damage is costly to repair and can cause unsafe conditions for drivers and pedestrians. Staying ahead of pavement deterioration with regular sealing helps protect your investment and keep your property in good condition.
Asphalt is petroleum-based, so oil and other automotive fluids soften it over time. Leaks can cause even more damage if not cleaned up promptly, and can lead to the kind of potholes that require expensive repairs or replacement. Sealcoating helps prevent these leaks by creating a strong protective barrier that slows the softening process, giving you more time to clean up any spills and stop damage before it spreads.
Humidity also plays a big part in how quickly a seal coat dries. The water in the coating must evaporate into the air, and when humidity is high it takes longer for this to happen. Ideal humidity levels for a seal coat are below 60 percent.
In addition to protecting against oil, sealcoating provides a strong layer of protection for your pavement from sun damage and freezing temperatures. UV rays can fade the color of asphalt, and this damage is made worse by snow and ice that melts and freezes repeatedly. A sealcoat blocks the UV rays and slows the fading process, helping your pavement last longer.
Another way that sealcoating protects your pavement is by repelling water. This prevents water from sinking into and damaging the asphalt, which can spread cracks further apart or lead to severe structural damage over time. It also makes it much more difficult for the water to become icy on the road, which is a major safety hazard for both drivers and pedestrians.
The only way to ensure that your seal coat offers this level of protection is to have it applied correctly by a professional. A qualified contractor will make sure that the pavement surface is completely dry before applying a seal coat, and they will take care to fill all the cracks in your asphalt. This will help your sealcoat last as long as possible, and it will look beautiful for years to come.
2. Aesthetics
Whether it’s a residential driveway or a commercial parking lot, a well-maintained asphalt surface is not only more functional but also aesthetically pleasing. A cracked, faded, and weathered pavement leaves a negative first impression and suggests a lack of care and maintenance. In contrast, a sleek and jet-black sealcoated surface radiates elegance and sophistication. From a real estate standpoint, a freshly sealed surface can significantly boost property value.
Aesthetic Impact
When applied properly, the durable sealcoat provides a thick and even layer that conceals minor damage, rejuvenates the appearance of aging asphalt, and enhances the overall look of a property. As an added benefit, the smooth and non-porous surface characteristic of sealcoating facilitates cleanliness by preventing water accumulation. It also averts the growth of weeds and slows down oxidation.
In addition, the protective sealant fills in surface voids and minimizes exposure to oxygen and water, which extends pavement lifespan by a significant margin. This simple yet effective maintenance procedure also prevents the formation of potholes and cracks, which not only appear unsightly but pose a safety hazard for pedestrians.
As a preventive maintenance technique, sealcoating is a cost-efficient option when compared to the costly alternative of repairing or replacing damaged asphalt. Additionally, it can extend the interval between asphalt resurfacing projects by years.
The most important aspect to keep in mind is that a successful sealcoating project requires thorough preparation and application. Before applying the sealant, professionals clean the surface to remove all debris and contaminants that may hinder adhesion. Additionally, the surface must be completely dry before applying the sealant to ensure a strong bond.
If you’re ready to give your asphalt a fresh look, Buck Brothers offers quality sealcoating services at competitive prices. Contact us today to schedule a consultation and discuss your needs! We can customize our services to meet your budget and timeline. We offer a wide range of finishes, from quartz sand to latex additives, and we can even apply textured coatings for enhanced skid resistance. We will ensure your asphalt is protected and beautiful for years to come.
3. Durability
Asphalt is an incredibly durable material, but its natural exposure to UV rays and harsh chemicals like water, oil, and road salt cause it to dry out and become brittle over time. Sealcoating protects your asphalt by providing a layer of protection that will slow down the degradation process and extend its lifespan.
The quality of the materials used in sealcoating is a crucial factor in determining its durability. Professional applicators, such as Salisbury Pro Sealers, only use high-grade products that offer superior longevity compared to low-grade DIY sealer options. Additionally, proper surface preparation is essential for a long-lasting sealcoat, including cleaning and repair of cracks and other imperfections in the surface.
Proper application is also vital to the durability of your sealcoat. A ride-on squeegee method is best for packing the sealant into the cracks and crevices of your asphalt, as opposed to spraying it on. This method ensures a smoother, more even appearance and increases the longevity of your asphalt’s lifespan.
Another factor in determining the durability of your sealcoat is its thickness. A properly-applied coat will be no more than one-eighth inch thick, creating a protective barrier that’s resistant to traffic and harsh weather conditions. When sealcoating is done correctly, your asphalt will be as mark-resistant as ever.
Finally, the amount of traffic and usage of your parking lot or driveway will impact how long your sealcoat lasts. Heavy-traffic areas will wear down more quickly than lighter-use areas, so regular maintenance and touch-ups may be necessary to prolong its life.
Aside from these factors, the lifespan of your asphalt sealcoat will depend on its frequency and duration. In order to get the most value out of your investment, it’s recommended that you have your sealcoat applied every 2 to 4 years, depending on the amount of traffic and usage your pavement experiences. Proper maintenance is also essential for extending the life of your sealcoat, such as regular sweeping, pressure washing, and prompt repair of any cracks or potholes as soon as they appear. By following these simple steps, you can ensure a long-lasting sealcoat that will keep your pavement looking brand-new.
4. Low Maintenance
Asphalt driveways and parking lots that aren’t seal coated are exposed to the elements and can develop cracks, potholes and other serious damage that requires costly repair. By simply applying a seal coat, these problems can be prevented before they occur and the surface of the pavement stays in pristine condition.
Seal coating also protects the pavement from oils and chemicals that can degrade the binder of the asphalt and lead to deterioration. Additionally, it protects the asphalt from UV rays that can cause fading and discoloration. If the driveway or parking lot has already deteriorated beyond a certain point, then no amount of sealcoating can restore it to a good condition. In this case, the damaged area needs to be leveled and repaired prior to being sealcoated.
The process of applying a seal coat isn’t as time-consuming as some people believe, and it is much faster than repairing severe blemishes or replacing the entire pavement. It is a good idea to have it done every two to three years to ensure that the asphalt lasts as long as possible.
Another benefit of sealcoating is that the work can be performed without the use of harmful solvents or chemicals. These chemicals can be detrimental to health and may even cause cancer, so it’s important to avoid them at all costs. Sealcoating is done by spraying a liquid over the asphalt that hardens and forms a protective layer. It is recommended that workers wear safety equipment like gloves and masks to avoid breathing in the chemicals.
While it is best to hire a professional to do the job, many property owners have been known to apply seal coating on their own. It’s essential to follow all instructions and guidelines that come with the product. Buying high quality sealant, cleaning the area and mixing it thoroughly are the most important steps in a successful application. It is also important to purchase a tool designed specifically for the job. Many companies offer manual agitation units that can keep the sealer mixed properly and prevent blockages.
Understanding Your Home’s Plumbing System
Plumber Strongsville OH are responsible for ensuring that the water and drainage systems in homes, buildings, and other structures work properly. This trade requires considerable skill and knowledge.
Plumbers work directly with customers and must be able to explain complex plumbing issues in simple terms. They also need to be able to interpret blueprints and other technical documents.

Plumbers are responsible for constructing and maintaining pipe systems that carry water, sewage, gas, and other materials throughout homes and commercial buildings. Their duties and responsibilities vary depending on the type of plumbing work that they do, but most plumbers are expected to perform the following tasks:
Plumbing technicians must have excellent troubleshooting skills to identify and repair issues with pipes and other plumbing components. This can include identifying leaks, repairing broken fixtures, and unclogging drains. Plumbers are also responsible for ensuring that all the pipes they install comply with local building codes and regulations.
While businesses employ many plumbers, they can also choose to work as independent contractors. This allows them to have more control over their work schedules and choose which projects they would like to take on. It can also be a more lucrative option for those with the right skills and experience.
Plumbers must have good customer service skills to communicate with clients and ensure that they are satisfied with their services. This can include discussing the costs of various plumbing solutions, answering questions about plumbing procedures, and providing estimates for repairs. Some plumbers may also be required to collaborate with other professionals, such as construction teams and architects, to ensure that all plumbing work is done properly and meets all necessary standards.
Plumbers are required to have a high level of physical stamina and strength as well as the ability to work in tight spaces and for long periods of time on their feet. They should also be comfortable working around chemicals and other potentially hazardous materials. Plumbers are also required to keep up with the latest developments in plumbing technology and equipment. This can include attending training courses, completing apprenticeships, and passing certification exams. They may also be required to submit to drug screening and background checks. In addition, some jurisdictions require plumbers to be licensed in order to perform certain types of plumbing work. Licensing requirements can vary by jurisdiction, but typically involve passing an exam that tests knowledge of the plumbing trade and local plumbing codes.
Education and Training Requirements
Plumbing is a skill that requires years of training and apprenticeship. It is also a highly technical trade, with complex systems and tools to work with. Plumbers must be competent in a range of areas, including system design, installation, and maintenance. This involves the use of a variety of hand and power tools, as well as advanced equipment such as steam and gas fittings. The plumber’s job can be dangerous, and proper safety practices must be followed at all times.
Depending on your state’s requirements, there are several ways to gain the qualifications necessary to become a licensed plumber. One option is the traditional “earn while you learn” approach, wherein a high school diploma or GED certificate qualifies you to take an apprentice program with a master plumber. These programs typically last 4-5 years and culminate in an exam. Vocational schools and community colleges may also offer training programs in plumbing, with courses focusing on local codes, plumbing systems, and practical skills.
In addition to formal training, there are a variety of other opportunities available for plumbers to advance in the field. For example, some manufacturers provide training on specific products or systems that they manufacture, which can be useful for plumbers who plan to specialize in certain types of equipment and fixtures. There are also a number of online learning resources that can help plumbers stay up-to-date on new technologies and industry developments, as well as on best practices for installing and maintaining different types of systems.
Finally, it is important for plumbers to have strong verbal communication skills in order to explain to customers what work needs to be done and the associated costs. They also need to be able to think critically in order to weigh the pros and cons of different solutions to a problem.
Many plumbing careers require plumbers to be on-call for emergency situations, which can mean that they must be willing to work evenings and weekends. This can have a negative impact on family and personal life, so it is important for prospective plumbers to consider these factors carefully before embarking on this career path.
License Requirements
For plumbers working in the state of New York, there are a variety of requirements to meet before pursuing a master plumber’s license. These may include completing an apprenticeship, passing an examination, and meeting other work experience requirements. The licensing process may vary from city to city as well, with specifics outlined by the State of New York Department of Labor.
The apprenticeship stage is critical in gaining the hands-on experience needed to succeed as a plumber. During this time, plumbers learn the tools of the trade and complete on-the-job training under the supervision of a master plumber or other qualified supervisor. This enables them to gain the skills required to perform plumbing services in residential, commercial and industrial settings. In addition, some apprentices choose to participate in Career and Technical Education (CTE) programs while they’re still in high school, as this can provide a pathway into an apprenticeship upon graduation.
To become a licensed journeyman plumber, individuals must have satisfactorily completed a four-year apprenticeship program or equivalent. They must also supply proof of at least 8,000 hours of plumbing work experience and pass a written journeyman examination. In addition, those seeking this title must submit affidavits from past and current employers attesting to their years of employment in the plumbing industry as well as good moral character. They must also pass a background check and drug screening test to be considered for the job.
Once a plumber becomes a journeyman plumber, they can begin their own business and take on more independent plumbing jobs, which gives them the flexibility to earn more money than a salaried employee of a firm would make. Plumbers who are self-employed are also able to choose their own clients and set their own schedules. Some also choose to specialize in certain aspects of the profession, such as sewer and septic systems, water heaters or fire sprinkler systems.
There are numerous soft skills that are beneficial for plumbers to have, such as critical thinking, verbal communication, and physical strength. Plumbers must also be able to read blueprints and architectural plans in order to correctly install plumbing infrastructure for construction projects. These tasks require the ability to follow instructions and a strong understanding of building codes, regulations and procedures.
Work Environment
A plumber’s work environment varies depending on the specific type of plumbing work they do. Those who focus on residential plumbing work, for example, may interact directly with customers and spend a lot of time in people’s homes or apartments. This can involve working in tight spaces and navigating around furniture or other fixtures. Plumbers who specialize in commercial or industrial work may spend more of their time at larger buildings like office buildings, warehouses, or factories. These environments often house large, complex plumbing systems that serve multiple occupants. In these cases, plumbers might collaborate with architects or construction teams to install new systems according to blueprints and specifications.
The demand for qualified plumbers is steady, meaning that there are always opportunities for those who want to work in this field. Plus, the job offers some stability and real career potential, as experienced plumbers can command higher hourly rates or even start their own plumbing businesses. The work can also be very hands-on and varied, so it’s a good choice for those who enjoy a challenging and rewarding career.
Mice Removal – How to Get Rid of Mice
Mice are common household pests that can cause extensive damage. They also spread diseases such as hantavirus pulmonary syndrome and lymphocytic choriomeningitis.
Look for signs of mice infestation, such as chewed-up paper and fabrics, gnawed wood, and damaged electrical wires. You can also listen for squeaks and scratching at night. Contact Mice Removal Texas now!

Mice are among the most common and persistent household pests, posing serious risks to human health and property. Their sharp incisors cause damage to walls, wires, and flooring while they search for food, materials, and shelter. Their droppings can contaminate food and other goods, creating an unpleasant odor. Mice can also chew through wiring, causing electrical fires.
Mice often enter homes through overgrown vegetation around the exterior of a building. Trimming tree branches and shrubs can help to eliminate this hiding place. In addition, keeping areas around the home clear of debris can prevent mice from entering through crawl spaces or attics.
The most obvious sign of a mouse infestation is the appearance of small and dark droppings. These can be found throughout the house, especially in cupboards, drawers, and along baseboards. Other signs include gnaw marks, dirt smudges, and an ammonia-like smell. The latter is caused by mice’s urine, which becomes foul as the rodents continue to use the same spots for defecation.
If you suspect a mouse problem, call for an inspection right away. A professional can help seal entry points and set traps to quickly remove the mice. They can also give advice on how to prevent future infestations, including making your home less attractive to rodents by eliminating easy-to-reach sources of food.
Mice need easy access to food to survive and breed, so make your home difficult for them by storing food in airtight containers and keeping the pantry and kitchen cabinets clean. Store pet food and bird seed in secure containers, and be sure to keep garbage cans tightly closed. Mice can also be a problem in basements and attics, so be sure to keep these areas dry and properly ventilated. Mice also like to live in wood piles, so move them away from your home. Finally, make sure that your roof is well-sealed and the gutters are free of debris. These steps, combined with proper trapping and mouse proofing, will keep the mice out of your house. For a more comprehensive program, ask your exterminator about a plan that includes regularly scheduled visits.
Getting rid of the Infestation
Whether they’re invading your home or business, mice cause problems by stealing food, chewing on electrical wires and fabric, contaminating papers and documents, spreading diseases, and leaving behind feces and urine. They can also gnaw through walls and ceilings, leading to structural damage.
A professional mouse exterminator can use a variety of trapping techniques to remove the mice from your property. They’ll set traps away from kitchens and tables, where mice are most likely to hang out, and near entrance points where they tend to enter.
If you’d like to tackle the problem yourself, you can try setting and monitoring mousetraps. Just be sure to clean traps and dead rodents thoroughly with disinfectant. Avoid sweeping or vacuuming mouse droppings, as doing so can release dust particles that carry viruses into the air.
Other DIY methods that can help keep mice at bay include using natural deterrents. The smell of certain essential oils such as peppermint and clove oil is a strong repellent for mice. Place cotton balls soaked with these oils in areas where you’ve noticed mouse activity, such as drawers and cupboards.
You can also use ammonia, which resembles the scent of a predator’s urine and is highly effective at keeping mice away. Again, be sure to place ammonia in areas that are frequented by mice, such as drawers and cabinets.
Another thing you can do to help keep mice away is to minimize their food sources. Mice can survive on as little as three to four grams of food a day, so cleaning up your floors and storing crumbs in airtight containers can go a long way.
Lastly, be sure to seal cracks, crevices and holes larger than a pen cap, both inside and outside your home or business. This will keep mice and other pests out, as well as water and snow. A professional can do this for you, or you can try sealing gaps yourself with a mix of cement and filler. You can also put steel wool in any openings that are large enough for a mouse to fit through.
Preventing the Infestation from Reoccurring
Mice are able to reproduce at a rapid rate, so even if you see one mouse in your home, if left untreated it will quickly become an infestation. This is why it is important to contact pest control specialists as soon as you suspect a problem. They can inspect your home and identify the source of the problem, as well as propose a plan to get rid of the mice and prevent them from returning in the future.
The most common sign of a mouse problem is droppings in or around your home. These droppings are similar to those of cockroaches, but are smaller and more pellet-shaped. You might also notice gnaw marks on wires or furniture, chewed up food packages and other indications of rodent activity. You might even be able to hear gnawing at nighttime, or observe your pet sniffing around a wall or under the refrigerator.
Since mice are able to squeeze themselves into spaces that are only a quarter of an inch wide, you must make sure that your home is protected from entrance points. This can be done by sealing any gaps around the exterior of your house, as well as repairing any cracks or holes inside of your home. You should also trim back any overgrowth of vegetation near your house, as this can serve as a bridge for mice to approach your home from above.
Mice are attracted to moisture as well, so it is important to reduce the amount of water that enters your home by repairing leaky pipes and gutters. You should also consider putting down mulch or gravel along the foundation of your home, as this will reduce the amount of water that is absorbed by the soil.
Finally, you should store grains, pet food and other dry foods in metal or glass containers instead of plastic, as these are harder for mice to chew through. This will also help to keep your food fresher for longer. You should also make sure that you keep your trash cans tightly closed, both indoors and outdoors, as mice are able to chew their way through trash bags.
Post-Infestation Prevention
Once the mice control company has eliminated the infestation and cleaned the area, it’s important to take precautionary measures to prevent a future recurrence. This can include eliminating entry points, sealing cracks and crevices, and cleaning regularly.
Pests are attracted to dark, damp areas where they can hide and reproduce. Eliminating this environment by using dehumidifiers and addressing moisture sources can help to keep the pests away from your property.
It is also a good idea to train staff on proper housekeeping practices, as dirt, dust and hair can encourage insect infestations. Keeping the building clean, using pesticides as needed, and carrying out regular inspections can also aid in prevention.
When dealing with a museum, the main way to prevent pests is through the use of traps and baits, a good housekeeping program, and frequent monitoring and inspection. The layout of shelving and cabinets should be organized so that it’s easier to inspect each area, and there should be clear lines of sight between areas, making it more effective to set traps and monitor them.
In addition to these measures, the best way to prevent a pest infestation is to eliminate the environment that attracts them. This can be done by patching holes in walls, limiting access to food shipments, and addressing moisture issues. Finally, reducing the number of plants in the garden can reduce the chance of insects and rodents coming into the building.
If you are looking for a Mouse Pest Removal service in Orange County, look no further than Malang Pest Control. Our specialists are experienced in handling all types of rodent infestations. Call us today for a free consultation! We can assess your property, create a customized plan, and start controlling the pests in no time. Our technicians will work hard to remove the pests and get your place back to normal in no time at all.
Why You Need a Motorcycle Accident Lawyer
Baltimore Motorcycle Accident Lawyer will help you recover compensation for your injuries and damages. This can include a loss of income, property damage, medical bills, and pain and suffering.
They understand insurance companies’ tactics to deflect blame and will advocate for a fair settlement on your behalf.

A well-versed motorcycle accident attorney will be familiar with the state laws governing these types of claims. They can ensure your case is filed correctly and protect you from insurance companies’ exploitation and manipulation to secure a settlement that adequately reflects your actual damages.
Your lawyer will thoroughly investigate the crash site and compile evidence to build your claim. This may include sourcing images, procuring relevant reports, assembling testimonies, and gathering medical documentation. In addition, they will strategically time the filing of your claim until you have attained what is known as maximum medical improvement. This is important because it will ensure that your recovery is maximized.
It is also possible for your attorney to quantify all past and future losses resulting from the accident. This list typically includes the costs of medical care, lost wages, property damage, and pain and suffering. The value of these damages can be difficult to assess, especially when they are incurred from the injuries sustained in a motorcycle crash.
The defendant breached their duty to you. This could have been through recklessness, negligence, or carelessness. For instance, they were distracted while driving and did not check their blind spot before changing lanes or turning at an intersection. They may have even been under the influence of alcohol or drugs.
Punitive damages are often awarded to punish the defendant for their actions and to discourage others from engaging in similar negligent behavior. Your lawyer can tell you whether or not punitive damages may be applicable to your case.
Negotiation
When seeking compensation for your injuries and losses after a motorcycle accident, it’s vital to have legal representation that has deep expertise handling complex cases related to negligence-related motorbike incidents. An experienced attorney has a clear understanding of state-specific laws and regulations that apply to your case, as well as a strong track record of successfully negotiating fair settlements on behalf of their clients.
Unlike car accident victims, motorcyclists frequently experience severe, life-altering injuries that require extensive medical treatment and substantial costs. Catastrophic injuries, such as traumatic brain injury and spinal cord injuries, can lead to permanent disabilities and have a significant financial impact on the victim, including lost income from missed work time and mounting medical bills. A well-seasoned motorcycle accident lawyer will understand the impact of these types of injuries on their clients, and they will fight to ensure that the full extent of your losses is reflected in the value of your claim.
Insurance companies that represent at-fault parties will often take advantage of injured victims and offer a lowball settlement amount. The experienced legal team at Pinder Plotkin will handle negotiations on your behalf and will refuse any settlement that fails to represent the full and fair value of your damages.
The settlement process often involves back-and-forth rounds of monetary offers and counteroffers. A seasoned motorcycle accident attorney will have the legal, communication, and critical thinking skills to assess each offer and counteroffer, as well as make recommendations that steer you toward making a settlement decision in your best interests.
An experienced lawyer will also know how to handle issues surrounding liens from health insurance providers. These liens can reduce the total amount of your settlement or jury award. A lawyer will work to ensure that your liens are properly handled, and they will also help you explore options for alternative dispute resolutions, such as mediation or arbitration, if a trial is not appropriate. These alternative dispute resolutions will also help you avoid the cost and stress of a lengthy trial. During the discovery phase, attorneys on both sides will exchange relevant information and evidence. This may include accident reports, medical records and bills, witness statements, and professional opinions.
Subrogation
When someone is injured in a motorcycle accident, it can be devastating. Injured riders often face massive hospital bills, long recoveries, and the inability to work. These circumstances can leave victims feeling buried under a mountain of debt, and it’s important to understand how these expenses may be covered through compensation awarded in an injury claim.
Our firm can help you pursue full, fair compensation for your medical and economic losses after a crash. We can review your losses and determine liable parties, then use our skills in settlement negotiations or in court to fight for the full amount you deserve.
Insurance companies have the right to subrogate, which means that they can seek reimbursement from any third party responsible for your losses. This allows them to pay claims more quickly and reduces their risk of having to pay for an expensive loss. It also helps them avoid paying out a large sum of money to one individual who may then sue the insurer over that loss.
A successful subrogation action can result in your insurance company getting some or all of your deductible back, which is good news for policyholders. In some cases, though, this process can take weeks, months, or even years to complete. This is because it is sometimes difficult to identify the at-fault party, and there may be disagreements over how much should be paid for your losses.
When the subrogation process is underway, it can be difficult to get an accurate picture of your accident’s impact on you. If you aren’t able to immediately seek medical treatment, for example, a claims adjuster or jury might believe that your injuries aren’t as severe as you say they are. In this scenario, it is important to always seek immediate care and follow the advice of your medical professional.
An experienced Brooklyn motorcycle accident lawyer can assist with subrogation by evaluating your crash and injuries. We can determine if the other driver is insured and can file a claim against their insurance carrier for your losses. We can also assess other liable parties, including construction companies, maintenance providers, or the government entity responsible for a road condition, to obtain additional compensation for your losses.
Justice
A good motorcycle accident lawyer can help you recover compensatory damages that cover monetary and non-monetary losses. These damages include pain and suffering, lost earnings and future wages, medical expenses and treatment costs, property damage, emotional distress, and a diminished quality of life. Some victims may also be eligible for punitive damages. This type of damage is awarded to punish the defendant and discourage them and others from taking part in similar negligent behavior.
A motorcycle accident lawyer’s job is to protect your rights throughout the claims process. They can anticipate the tactics insurance companies use to shift blame onto motorcyclists and can counter them effectively. They can ensure that you receive the full and fair amount of compensation for your injuries.
They can help you find an appropriate medical care provider to treat your injuries and determine the extent of your damages. They can also help you get a reasonable estimate of the value of your motorcycle and other personal items that were damaged in the accident. They can also help you calculate your projected future expenses and needs, including the cost of a nursing home or other long-term care, as well as any loss of income that you will experience.
Your attorney will review police reports, witness statements, and other relevant documents to help them build your case. They will also investigate the cause of the accident and determine who was at fault. They can then build a strong claim on your behalf, helping you win the maximum compensation possible.
An experienced motorcycle accident lawyer knows when it’s time to fight and when to settle. They will carefully weigh all of the factors involved in your case and help you make the best decision. They will also know when it’s in your best interests to negotiate with the insurance company and how much they are willing to pay.
A New York City-based law firm, Finz & Finz P.C., represents clients in cases involving accidents that result in severe physical injury and wrongful death. They provide individualized legal services and work with their clients to recover compensation from the responsible parties, including negligent drivers. The firm also handles civil rights and workers’ compensation cases.
Different Types of Fence
A fence is a structure that separates one property from another. It can be made from various materials and can be functional and decorative. Municipal ordinances commonly regulate fences.
Before beginning construction, talking to your neighbors about any fence you want to build is important. It’s good neighborly practice and can save you a lot of stress, not to mention potential legal trouble, down the road. Click the Charlotte Fence Company to learn more.

Redwood is a leading wood fence material renowned for its deep, warm tones and natural beauty. It stands out among other options for its superior durability and resistance to weather and insects, requiring less maintenance upkeep over the years. Redwood is also a more sustainable choice for homeowners concerned about environmental impact. Its natural tannins and oils serve as a natural preservative against moisture damage, reducing the need for chemical treatments and preserving the integrity of your fence over time.
There are different grades of redwood lumber that differ in their appearance and function. Garden grades are knotty, rugged and economical while architectural grade has fewer knots with a more uniform look that is better suited for decorative fences. Redwood grades run from Construction Heart on the high end to Merchantable Common on the low end. Grades that contain the word ‘heart’ consist of all heartwood from the center of the log while those with the word ‘common’ have an amalgamation of heartwood and sapwood (exterior wood).
Like cedar, redwood is durable and holds up well to outdoor elements such as rain and sun exposure. However, unlike cedar, it does not need to be painted or stained as its natural oils serve as an effective protective barrier against mold and mildew growth, rot and insects. It is a smart option for wetter climates where other types of fence can become damaged by the rain and humidity.
For an added level of protection, redwood can be drilled and bolted to steel posts to resist against impact. It is also possible to use metal straps between the posts to add additional strength and support. When installing, it is important to dig holes for the posts so they are a good distance apart. Leaving a bit of space between the posts prevents warping.
If you are looking for an alternative to redwood, consider cedar or cypress fencing. Both are rot-resistant and insect-repellent, with the added benefit of a pleasant fragrance in your backyard. Cypress is a particularly strong choice because it contains the natural insect-repellent cypretine, which can extend the lifespan of your fence.
Cedar
Cedar fences are a popular option because they offer a beautiful natural look that can complement any property. The rich reddish tones and wood grain patterns create a warm and inviting atmosphere. Cedar is also weather-resistant, meaning it will last longer than other types of fence if it’s properly maintained. Cedar’s unique oils are naturally preservative, providing built-in protection against rot, decay, and insect infestation. Additionally, cedar does not require any chemical treatment that may damage the environment.
Because of these qualities, cedar is a cost-effective option that can increase your home’s value. However, you must be aware of the quality of cedar used in your fence to get the most out of its longevity. Some fence companies use low-grade cedar or other non-cedar wood that may not have the same resistance to harsh weather conditions. You can tell whether your company is using low-quality materials by checking for the “C” or “D” grade stamp on the boards. The higher the grade, the better the quality of the cedar.
A clear cedar grade comes from closer to the heart of the tree and has fewer knots and blemishes. It has a very smooth surface and can be stained easily to match your home’s aesthetic. #2 grade cedar has more knots, pin holes, streaks and skips (skips occur when the board is milled and are the result of uneven planing). #3 grade cedar has larger knots that might need to be caulked or filled with paint to prevent them from falling out and creating holes in your fence.
Cedar is a popular choice for fences because it is naturally resistant to rot, decay and insects. It’s dimensionally stable and will not warp or twist, which is why it has an edge over pressure-treated pine. However, the chemical preservatives in treated wood can cause it to take on a greenish tint and shorten its lifespan.
While pine is a less durable wood, it can still provide a worthwhile lifespan with proper maintenance. It’s an ideal choice for those who want a customizable canvas to express their own style. Pine also takes wood stain and paints very well, making it easy to match your fence to your home’s aesthetic.
Oak
Oak is a durable and attractive choice for wood fencing. It is also versatile and suitable for many different types of properties. It’s a popular option for residential and farm fences, as it can withstand the elements and the wear and tear of heavy traffic. Oak is available in a variety of colors and textures, and it can be stained or left natural. In addition, it can be treated with natural oils to protect the finish and prevent rot or insect infestations.
The type of wood you choose for your fence should be determined by a number of factors, including the climate where you live and your budget. Cedar and redwood are excellent choices for wetter regions, while pine and oak work well in drier climates. If you’re willing to spend a little more money, exotic hardwoods like Brazilian cherry and tigerwood are beautiful and long-lasting.
Another consideration when selecting a wood fence is the style of design you prefer. For example, if you want to add privacy to your yard, consider a board-on-board fence, which features boards that overlap with each other instead of being side-by-side. This style of fence is especially effective in storm-prone areas.
Once you’ve settled on a type of wood, consider the maintenance and cost of each option. Some species of wood are naturally resistant to rot and insects, making them the best choice for wetter climates. On the other hand, some woods require more regular maintenance to keep them looking good.
When choosing a wood fence, you should also take into account the cost of the fence and installation. The most expensive options are often the longest-lasting, but they may not be suitable for all homeowners. For example, a cedar fence may be more expensive than a pressure-treated pine fence, but it will last longer and offer better protection for your property.
The type of wood you choose for your fence will determine how durable it is and how long it will last. For example, redwood is a great choice for wet climates because it is naturally resistant to rot and insect infestations. Other woods, such as oak and pine, are less resistant to moisture and pests and should be treated with a water-resistant sealant if they’re installed in a wet region.
Pine
Pine fencing offers a more natural, affordable option for those who want a wooden fence that doesn’t require the high maintenance standards of cedar. This type of wood also absorbs stains and paints well, so it’s easier to customize the look of your fence to match your home. However, a pine fence is not as stable as a cedar one and can warp and twist over time. This can lead to pickets loosening from their rails, which will require more time and money spent on repairs than a fence made with cedar.
When choosing a pine fence, consider the climate of your region. A wetter environment is better suited for redwood or cedar, while pine, oak, and cypress work well in drier regions. Pine is often treated with chemicals, which can have long-term environmental impacts. Cedar, on the other hand, doesn’t need chemical treatments to preserve it, which makes it a more sustainable choice.
Another important consideration when selecting a wood fence is your local termite population. Some types of wood naturally repel termites, while others attract them. It’s important to know your local pest situation when selecting a wood type for your fence, as some may need to be treated with an insecticide.
While a pine fence is less expensive than a cedar fence, it isn’t as durable. It can be prone to rot and insect damage, so it’s crucial to maintain your pine fence properly. Regular cleaning, staining, and sealing can help prevent the onset of these problems.
A lapped pine and lattice fence, also known as a Federation style fence, is a popular option for those looking to achieve a classic look. These fences are constructed from plantation grown CCA treated pine palings and are usually built up to 2.4 metres high, depending on council fencing height restrictions. This style of fencing offers privacy and a beautiful backdrop for any garden or backyard.
Exterior Cleaning Boosts Curb Appeal and Prevents Potentially Harmful Contamination
Martini Exterior Cleaning encompasses a variety of tasks that rejuvenate and preserve a building’s exterior surfaces. It prevents deterioration and halts potentially harmful contaminants like mold, mildew, and algae.
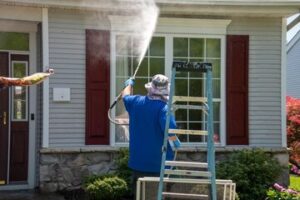
The right equipment can make the difference between a job well done and one that is not. Adding the right long-handled telescopic brushes and cleaning solutions to your arsenal allows you to clean clinker facades, thermal insulation composite systems, and rough-rendered bricks safely.
When it comes to a home’s exterior, curb appeal plays an important role. It’s the first impression visitors, neighbors, and potential buyers get of your property and influences how they perceive your home’s overall value. A welcoming exterior shows that you take care of your home and takes pride in its appearance. This is why many homeowners spend a significant amount of time and money to make their homes appealing.
Whether you’re looking to sell your home or are just trying to give it a fresh, new look, curb appeal can improve the look of your home and increase its value. But the truth is, you don’t have to go overboard with your efforts. There are plenty of cost-effective and easy ways to boost your home’s curb appeal, like mowing the lawn, trimming shrubbery, and eliminating any miscellaneous trash or garbage. But one of the best and most affordable curb appeal strategies is professional exterior cleaning.
Exterior cleaning removes dirt, grime, mold, mildew, and biological growth from the exterior of your building and surfaces. It also includes pressure washing sidewalks, walkways, patios, driveways, and decks. By eliminating the visual hindrances of stains and dirt, you can allow your building’s design features and architectural elements to shine through, leaving a lasting, positive impression on those who visit.
In fact, research shows that homes with attractive exteriors sell for 7% more than comparable properties. To boost your curb appeal, consider hiring a professional exterior cleaner who offers soft or power washing services. Not only can these professionals help you clean your home’s exterior quickly and effectively, but they can also advise you on the best ways to enhance your property’s aesthetic. For example, they may suggest adding a pop of color or choosing the right paint colors for your shutters. Or they might recommend changing your landscaping to create a more inviting entryway. Whatever the case, the professionals at Stag Softwash can help you create a beautiful, welcoming home with their exterior cleaning services. They have years of experience in the industry and can ensure your home’s exterior looks its best.
Energy Efficiency
A building’s exterior needs to be cleaned periodically to maintain its appearance and protect against damage. During this process, professionals remove dirt, debris, mold, mildew, algae growth, and other contaminants that accumulate on surfaces like windows, roofs, siding, driveways, parking lots, and gutters. The removal of these materials also helps to prevent energy loss and saves money on electricity and heating costs.
A clean exterior also boosts a property’s value and makes it easier to sell or rent out space. Moreover, it creates an inviting atmosphere and gives potential buyers or tenants a sense of pride and satisfaction about the place. This is important as studies have shown that properties with well-maintained curb appeal tend to sell or rent for more than those with less attractive and unkempt exteriors.
Additionally, cleaning a building’s exterior reduces safety hazards and mitigates legal liabilities for the owner or operator. This is because slippery surfaces can lead to slips and falls, which may cause serious injuries. Regular cleaning of a commercial property’s exterior can help to eliminate these hazards and promote a safe working environment for employees and visitors.
Dirty surfaces absorb more heat from sunlight, which in turn raises cooling bills. A clean surface reflects the sun’s rays, which keeps the indoor temperature at a comfortable level without the need for excessive air conditioning. By investing in professional cleaning, businesses can save on energy expenses and improve the sustainability of their operations.
Mould, mildew, and lichen growth not only degrade the look of a home or business, but they can also pose health risks for residents. These contaminants can trigger allergies, asthma, and other respiratory problems. Professional cleaning eliminates these threats and provides a healthier living environment for families.
Regular exterior cleaning helps to extend the life of paint, siding, and roofing materials. This reduces the need for expensive repairs and replacements. It is essential for preventing damage caused by weather, pollution, and general wear-and-tear. Professional cleaners use eco-friendly products that are effective at removing harmful substances while protecting the environment and surfaces. They also use soft washing techniques for delicate surfaces.
Health
When most people think of spring cleaning, they imagine dusting, washing and scrubbing their home from top to bottom. While this is a great idea for the interior of your property, it is also important to clean the exterior of your house and ensure that it looks as good as new. Regular cleaning of the outside of your property not only boosts its aesthetic appeal, but it also helps to protect it from severe weather damage and other potential hazards.
Nothing is as exposed to environmental influences as a house exterior and over time visible traces of dirt, dust and grime start to accumulate. Rain, wind and UV rays are just some of the factors that cause this to happen. Thorough cleaning of the house facade using a pressure washer helps to remove these traces and keep the facade in good condition. However, it is essential that the correct method is used for each type of facade. Intact clinker brick, render and wood facades can be cleaned with water pressure, but composite resin and external wall insulation systems (TICS) require gentle cleaning methods.
Aside from the aesthetic impact of a dirty house exterior, it can also be dangerous for residents and visitors. For example, moss, algae and dirt can make walking surfaces slippery. This is especially a problem in our damper northwest winters and can lead to accidents and injuries. Regular exterior cleaning with a specialized tool like the STIHL CS 100 stone and facade cleaner reliably eliminates these dangers and helps to keep families, guests and residents safe.
It’s also worth mentioning that a thorough cleaning can help to reduce allergens in the air. For this reason, it is particularly beneficial for households with family members who suffer from allergies. Regular cleaning also helps to prevent the build-up of mold, fungus and mildew that can lead to health issues for residents and their guests. By removing the built-up contaminants, regular cleaning can also help to prolong the life of paint and other surface materials. This will save on repair and replacement costs over the long term.
Safety
Keeping the exterior of buildings clean is not just about maintaining appearances. Excess dirt and grime can corrode surfaces, and this deterioration can have long-term effects on the structural integrity of buildings. Regular exterior cleaning can prevent this from occurring and ensure that buildings are well-maintained for years to come. Exterior cleaning involves the use of soft washing and pressure washing techniques to remove dirt, moss, bacteria, algae, mildew, bird droppings, and other harmful substances from walls, roofs, driveways, patios, and other outdoor spaces.
There are many benefits of hiring a professional cleaner to carry out exterior cleaning. Cleaning professionals can use the latest equipment and cleaning methods to clean even the most difficult areas of a building. They can also use the appropriate level of pressure to avoid damaging delicate surfaces. For example, cladding and other types of house facade may be sensitive to high levels of water pressure. This is why it is important to choose the right cleaning method and products for each surface.
The most obvious benefit of exterior cleaning is the immediate improvement in a property’s appearance. Dirt, mildew, moss, and other contaminants can make a building look dingy and uncared for. A thorough cleaning by a professional can remove these unsightly elements and restore the original beauty of the building.
Exterior cleaning can be done on residential and commercial properties. For example, a building owner may want to hire professional cleaners to clean the exterior of their home before listing it for sale. This can help boost the market value of the property and make it more appealing to potential buyers.
A clean exterior of a building can also improve the health and safety of occupants. Mold, mildew, and algae can cause respiratory problems for residents of a building. These organisms thrive in damp and shaded areas, and they can be particularly problematic for hospitals and other medical facilities. Regularly cleaning the exterior of a building can eliminate these organisms and ensure that a building is safe and hygienic for patients and visitors.
While boosting the curb appeal of a property and improving its health and safety are key benefits of exterior cleaning, there are many other reasons to keep your property’s exterior in good condition. A dirty building can erode its structure over time, leading to costly repairs and replacements. Investing in regular exterior cleaning can save money and protect the value of your property for years to come.
Types of Roofs and How They Are Constructed
The roof is the most vulnerable part of your home and needs regular inspections to prevent expensive damage. Fortunately, most homeowners’ insurance policies cover damage caused by storms and natural disasters.

Performing a roof inspection requires access to your attic or crawlspace and a ladder that’s tall enough to reach the roof. You’ll also need a level, measuring tape and a ladder stabilizer.
A roof is a covering for the top of a building, which serves to protect it from rain, snow, sunlight, wind and extremes of temperature. It is constructed in a wide variety of shapes and forms as dictated by technological, economic and aesthetic considerations. Some of the most common types include flat roofs, pitched roofs, vaulted ceilings, domed roofs and even green and solar roofs.
Some of the most common reasons for a roof repair include leaks, storm damage and wear and tear. It is important to note that some damage to a roof may not be immediately apparent and can only be detected by a thorough inspection from an experienced roofer.
There are a few different types of roof repairs, including repairing shingles and flashing and replacing ridge caps. Roof shingle repairs are usually relatively simple and can be done with basic tools by the average homeowner. However, a homeowner should always be cautious when performing these repairs themselves and should consult with a professional if there are any questions or concerns.
Flashing is metal or plastic material that is used to seal the intersections of a roof, such as around chimneys and vents. It is critical to regularly check and fix any areas of leaking flashing, as water penetration can cause serious structural damage to the roof.
Another type of roof repair is replacing ridge caps, which are often made of aluminum or copper and can be found in the eaves, valleys and other high points of a roof. They help to reduce water and wind infiltration and can also improve the look of a roof. If your ridge caps are damaged or missing, it is important to replace them as soon as possible to avoid leaks and further damage to your roof.
What is a shingle?
Shingles are a type of roofing material that is organized in overlapping rows to cover the roof. They are available in a variety of colors and materials, including wood, asphalt, fiberglass and slate. They are typically coated with granules, which help to protect the shingle from weather damage. They may also be coated with a reflective substance to help reduce the amount of heat absorbed by the roof.
There are many different types of shingles, including 3-tab shingles, architectural shingles, premium shingles and dimensional shingles. Each shingle has its own distinct characteristics and advantages or disadvantages. For example, architectural shingles have more color choices and are thicker than a 3-tab shingle. They are also easier to install than a traditional asphalt shingle.
In addition to examining the shingles, the contractor will also look at the decking of the roof. This will help them to determine if there are any soft spots or wood rot. If there is, the roof deck will need to be replaced. This can be done using plywood or oriented strand board (OSB).
The shingles may also need to be repaired or replaced. Damaged shingles can lead to leaks, which will in turn cause water and mold damage in the home or business. It is important to have these shingles repaired as soon as possible to prevent further damage.
A repair can be made to a damaged shingle by replacing it with a new shingle. A roof repair specialist will be able to replace the old shingle and ensure that it is properly installed to avoid further problems. They will also check the shingle for any missing granules, which can wear away over time.
What is a roof membrane?
A roof membrane is a flexible, flat or low-sloped sheet of waterproof material that covers and protects a roof deck. It prevents water from leaking into your home through the roof and can be made of a single material or laminated together. Membrane roofs are popular for flat or low-slope roofing projects because they are cost-effective, easily installed and easy to repair.
A membrane can be made of a wide variety of materials, from PVC to EPDM rubber and neoprene. Each has its own unique advantages. EPDM is a popular choice for residential roofs because it resists ozone exposure and can last twenty years or more. PVC, on the other hand, is incredibly durable and has excellent fire resistance. It also holds up well to abrasion, making it ideal for commercial and industrial buildings with heavy foot traffic.
If you’re looking for a membrane that is more environmentally friendly, you should consider a thermoset membrane such as polyvinyl chloride (PVC) or thermoplastic olefin (TPO). These are both made of synthetic rubber, but the manufacturing process involves heating them and curing them to create an incredibly strong bond. These membranes are safer for the environment and the people who work on them, plus they’re better at resisting ozone damage and abrasion.
If you’re working with a tight budget, a built up roof (BUR) may be a good option. However, BUR has trouble creating a tight seal at seams and connections, which leads to leaks early in their lifespans. Newer membrane systems use seamless or thicker materials that are much easier to install and maintain. They can even be heat-welded or hot-applied to the roof to increase their longevity and durability.
What is a roof flashing?
Roof flashing is a protective barrier that deviates the flow of rain, sleet, and snow to avoid water leaks into a home. It’s installed at gaps, joints, and other interruptions in a roof. Flashing can also help prevent damage to the underlying roofing materials from the elements that cause them to degrade over time.
Typically, flashing is made from metals like copper, aluminum, and galvanized steel. These materials are popular for roof flashing because of their durability and resistance to corrosion. They can be shaped and molded to fit the contours of a roof. They are also resistant to fire and heat, making them a great choice for chimney flashing and other high-end roof penetrations. They are also durable enough to withstand the test of time and can be expected to last for years with proper maintenance.
Different types of flashing are used to accommodate various roof and wall penetrations. For example, step flashing is “L” shaped and is installed at walls and goes up the rake of the roof in between each shingle. Counter flashing is then installed on top of the step flashing to make sure that no water can penetrate past it and into a home’s structure. Apron flashing is designed to be installed in conjunction with brick or concrete walls/structures and is shaped like an L to fit the base of these areas.
Before installing flashing, the area is inspected for damaged shingles or other roofing materials and cleaned. The flashing is then measured and cut to fit the area and is secured with a waterproof sealant. Expansion joints should be included on long runs of flashing to ensure that the material doesn’t deform or crack during contraction and expansion of a building’s walls and roof.
What is a roof vent?
A roof vent is a device that allows fresh air to enter an attic space and stale air to exit, creating a continuous circulation of air. A well-ventilated attic space is crucial for preserving the life span of roofing materials, reducing the risk of mold and pests, and preventing moisture from damaging the attic and structural wood below it.
There are several types of roof vents available, depending on the style and function you’re looking for. For example, ridge vents are cut directly into the attic’s ridge line and run across its entire length. They are popular because they’re easy to install and offer good ventilation with little visibility from the ground. For added protection, a baffle is installed in ridge vents to prevent insects, rain and snow from entering the attic.
Gable end vents are another common option. They are installed in the gables (the triangular sections at each end of a home’s attic) and are easy to access for maintenance and inspection purposes. They’re also aesthetically pleasing and can be stained or painted to match other exterior features of the house. In addition, gable end vents are often designed to protrude above accumulated snow and ice, protecting the vents from melting and freezing.
How to Build a Plumber’s Reputation
Plumbing involves the installation, repair and maintenance of pipes and fixtures for the distribution of water and removal of wastewater. A plumber’s job requires physical strength and the ability to work with a variety of tools.

During an interview, hiring managers should focus on the depth and breadth of an applicant’s hands-on experience. They should also evaluate the candidate’s professionalism and reliability.
A plumber’s reputation is one of the most important aspects of his or her business. In a competitive industry, customers want to know they can trust their plumbing companies. A good reputation attracts new clients, increases customer loyalty and improves a company’s bottom line. A plumber’s reputation is created by several factors, including client reviews, professional training, and adherence to ethical standards.
Online reviews are a crucial part of a plumber’s reputation, and should be monitored regularly. A positive online review can increase a plumber’s visibility and attract new customers. It’s also important to address negative reviews promptly and professionally.
Many people use search engines like Google to find local service providers, and often read reviews before making a decision. These reviews can help you determine whether a plumber is right for you and can impact your final decision. Some of the most effective ways to build a positive online reputation for your plumbing company include providing excellent customer service, encouraging satisfied customers to leave reviews, and responding to negative feedback.
A great plumber has a reputation for reliability, punctuality and quality work. These characteristics can help you choose the right plumber for your home or business needs. They should be available by phone, email or online chat, and they should respond to all inquiries quickly. Moreover, they should be able to provide accurate quotes and complete the job on time.
Reputable plumbers have a wide variety of tools and techniques to solve problems. They can repair broken drains, fix leaky faucets and toilets, install hot water heaters, and more. They can even replace your whole plumbing system if necessary. They also have the latest tools and technology to make your home or office run smoothly.
Reputable plumbers are also licensed, insured and bonded. They adhere to strict codes of ethics and are members of trade associations. This gives them a competitive advantage and helps ensure their clients’ safety. They also offer competitive rates and discounts for repeat customers.
License
Plumbing is a trade that requires an in-depth knowledge of the materials and tools used, as well as the practical aspects of building and maintaining piping systems. Plumbers are also required to follow health and safety guidelines when working with dangerous machinery or materials. Plumbers typically work in a wide range of environments, including residential and commercial buildings and industrial plants. Their responsibilities and duties include inspecting existing pipe work; testing pressure levels; locating blockages or leaks; fitting replacement parts such as valves or taps; installing new pipes and appliances; connecting waste disposal units to drainage systems; carrying out repairs on drain lines, sewers, gas lines and other forms of piping materials; replacing broken sealants around baths or sinks; power flushing central heating systems and advising customers on best practices when it comes to maintaining their plumbing.
Most plumbers receive their training through an apprenticeship, which combines classroom instruction with paid on-the-job experience. Apprenticeships generally last between four and five years and cover a range of topics, including local codes and regulations, blueprint reading and safety practices. Some community colleges and vocational schools offer plumbing programs that can help you get started in this career.
Licensing requirements for plumbers vary by state, but most require a high school diploma or equivalent. Some states also require you to pass a state-approved exam. Plumbers are required to have a valid license before performing any plumbing work on their own. Obtaining a license demonstrates your skills and knowledge of the trade.
In New York, you must have at least 7 years of work experience as a journeyman plumber before being eligible to take the master plumber exam. Two of these years must be as a licensed journeyman in New York City, and at least one year must have been spent performing plumbing maintenance or repair. Related academic or technical training may be substituted for some of the experience requirement, but it must be documented in the application.
You must also supply signed and notarized affidavits from master plumbers who will vouch for your experience. These must include dates, a description of your duties and jobs and indicate that they directly supervised you. You must also provide two passport-style photographs for the application.
Insurance
A licensed plumber is a skilled tradesman who helps maintain and repair the pipes that carry water, gas, and other substances in homes and buildings. Because of the risks involved, plumbing contractors need comprehensive insurance packages to protect themselves and their businesses. These policies help cover costs associated with damages, project delays, and even legal disputes.
The types of coverage a plumber chooses to include in their policy can significantly impact cost. For example, the liability limits and deductibles selected will affect how much the insurer pays out in claims. Also, the type of property coverage (e.g., tools and equipment) will determine whether a plumber’s premium is higher or lower than that of a business that doesn’t own any gear.
In addition to core policies, plumbers should consider purchasing a few other types of coverage to further protect their business. For example, professional errors and omissions insurance may help pay for any legal fees or judgments awarded against the plumber if an error or omission leads to financial loss. Also, workers’ compensation may help defray the costs of medical treatments and assist with programs that aid employees who are injured at work.
Finally, flood insurance can be an important add-on to a home warranty or plumbing insurance policy. This type of coverage protects homeowners from unexpected damage caused by flooding from rivers, tidal surges, and heavy rains. It’s important to note that homeowners insurance typically doesn’t cover flooding due to plumbing problems, so a plumber must have separate flood insurance for this type of damage.
Regardless of the type of coverage purchased, it’s a good idea for any plumbing contractor to review their policy regularly to ensure they are adequately protected. Additionally, regular maintenance such as checking for leaks and insulating pipes in cold weather can help reduce the risk of plumbing issues that could lead to expensive insurance claims. Working with a specialist insurance agent or broker who understands the unique needs of a plumbing business is also helpful, as they can help provide advice and access to top insurance markets for this type of coverage.
Portfolio
A plumber’s website should feature a clear and well-designed homepage that gives visitors an overview of the business and its services. It should also include information about the plumber’s team and business history, as well as their qualifications and certifications. It’s also important for a plumber to showcase their past work on a portfolio page. This can help them build trust and credibility with potential customers.
A good plumbing website should also be designed with responsive web technology to make it easy for visitors to access the information they need on any device. This means that the site should be compatible with desktop computers, laptops, tablets, and smartphones. A responsive plumbing website will also improve its SEO, as Google rewards websites that are mobile-friendly.
Plumbing is a highly skilled and rewarding career, offering job stability and long-term earning potential. The work is often hands-on and varied, and plumbers can find themselves working on a variety of different projects. They may be involved in installing new plumbing systems, or repairing leaks and clogs. They may also be responsible for a variety of different tasks, such as testing water pressure and draining toilets.
Many plumbers are now leveraging the latest technology to offer their customers a more seamless experience. For example, some plumbers are integrating smart home technologies into their service offerings, while others are installing energy-efficient fixtures like low-flow toilets and showerheads.
It’s also essential for a plumber to establish a solid foundation for their business by building a solid network of relationships with contractors and homeowners. This will allow them to gain valuable leads and referrals that can lead to business growth. Ideally, a plumber should have at least one referral partner in every city and county that they operate in.
To maximize the effectiveness of a plumber’s website, they should ensure that it has a strong and clear call-to-action (CTA) that encourages visitors to contact the business or book an appointment. Moreover, they should use the CTA on multiple pages of their website to increase their chances of getting more leads.
Glass Pipettes Require Proper Handling
Glass pipettes are a valuable tool in laboratory settings requiring precise liquid handling. These calibrated tools allow volume measurements using graduated markings and offer flexibility in dispensing liquid volumes. Contact Stellar Scientific now!
They also provide versatility in laboratory procedures like solution dilution, chemical reactions, and testing pH. They are essential in chemistry laboratories and pharmaceutical industry applications but require careful handling and proper cleaning to prevent contamination.

Glass pipettes are used to make precise measurements in small milliliter increments, which are important for many tests and applications. They are a valuable tool for laboratory work, but they require proper handling to prevent errors and ensure accurate results. Incorrect use can lead to liquid loss, contamination, and other issues that can negatively impact the success of an experiment or test.
In order to achieve accurate and consistent measurements, it is crucial that a pipette be properly calibrated, clean, and maintained. The best pipettes are constructed from borosilicate glass and have a smooth interior that is free of chips, defects, and adsorbed solids. Glass pipettes are also chemically inert and impermeable to atmospheric gases, which helps them resist oxidative degradation and remain useful over a long period of time.
Pipettes come in a variety of shapes and sizes, and each type has specific features that affect its performance and utility. The most common pipettes are graduated and consist of a tube with indicated volume increments alongside the tip. A tapered end helps to improve grip and comfort. The tube is also crafted from glass or strong plastic. Pipettes can be further categorized as Type 1, Type 2, and Type 3 based on their construction. Type 1 pipettes have a zero and a nominal value, while type 2 and type 3 pipettes supply solutions exclusively at the nominal value.
When using a pipette, it is important to read the meniscus and understand how the different parts of the instrument function. It is also crucial to remove any liquid adhering to the tip before transferring it to another container. Having a clean and dry tip allows the pipette to deliver the correct volume, which will contribute to the accuracy of measurements.
While it is acceptable to aspirate liquids with a hand or mouth, it is essential that lab workers avoid using their fingers as this can introduce contamination during the transfer process. Instead, it is advisable to use a safety pipette bulb, also known as a rubber bulb or pipette filler. This device is available in a variety of designs, including three-valve bulbs and thumb wheel types, which can help prevent aspiration from the lower part of the pipette and improve overall safety.
Accuracy
Whether used to transfer liquid samples or to perform chemical assays, accuracy is key for successful laboratory results. Glass pipettes enable scientists, researchers, and technicians to accurately measure and transfer liquid volumes, contributing significantly to the reliability of their experiments and analyses. In addition to being calibrated for specific volume measurements, glass pipettes are durable and highly resistant to breaking. They can also withstand exposure to harsh chemicals and solvents, making them suitable for use in laboratories.
Glass pipettes are typically made from borosilicate glass, which is known for its strength and durability. This material is also chemically inert and does not react with the liquids they come into contact with. This property is essential for applications that require the preservation of liquid purity and prevents the contamination of sensitive materials. Additionally, glass pipettes are designed to be reusable and can be easily cleaned and sterilized between uses. This feature contributes to the efficiency and cost-effectiveness of their use, offering significant savings in both time and resources.
Although pipettes are useful tools for a variety of applications, they do have some drawbacks that should be taken into account when using them. For instance, they can be time-consuming to use when transferring large quantities of liquids. Additionally, if they are not handled carefully and properly cleaned and sterilized, they can pose a risk of contamination. This may lead to compromised experimental results and inaccurate data, particularly in environments where infection control is essential.
Another concern associated with the use of glass pipettes is their fragility. They can break or crack if dropped or if they are mishandled. As a result, they should be stored with caution and used only in laboratories that have appropriate safety measures. In addition, it is important to avoid dropping or damaging the tip of a glass pipette, as this can negatively impact the accuracy of its measurements.
Finally, it is important to remember that a glass pipette should never be aspirated by mouth. Aspiration can cause damage to the tips and the interior of the pipette, leading to loss of liquid, inaccurate measurement, and contamination. Instead, it is recommended to use a suitable pipette bulb or filler when aspirating.
Durability
Pipettes are used in numerous lab applications and can be a valuable tool for transferring liquids precisely. They are reusable and offer a cost-efficiency, but they must be handled carefully to prevent breakage and accidents. Additionally, pipettes must be cleaned and sterilized properly after each use to maintain their accuracy and prevent cross-contamination of the sample.
The working principle of a glass pipette involves creating a vacuum at the bulb or suction end of the tube, which allows for precise aspiration and dispensing by capillary action. The pipette’s orifice is the tip that comes into direct contact with the sample. This point is typically marked with a volume mark, allowing the user to know how much liquid to transfer. The tube’s walls are constructed from borosilicate glass, which is known for its strength and durability. This material also resists corrosion, making it an ideal choice for handling chemicals and other toxic substances.
A small rubber washer is usually placed between the bulb and the suction end of a pipette to create a seal and prevent leakage during aspiration and dispensing. Some types of pipettes have additional features such as a blow-out ring near the upper most or suction end of the tube to help remove any residual liquid that may be trapped during aspiration and dispensing. Other features such as a serological ring are often found on smaller pipettes designed for serologic experiments and are useful in preventing cross-contamination.
Glass pipettes are a useful tool for chemical and other lab analyses, especially in the pharmaceutical industry. They play a critical role in transferring precise volumes of liquid during drug production and quality control processes. Additionally, they can be used in plant tissue culture for precise nutrient addition to encourage growth and development of plants. Microbiology is another common application for glass pipettes, which are used to transfer precise volumes of bacterial or other microorganisms to reaction vessels.
The durability of a glass pipette makes it an excellent choice for repeated, high-volume applications such as cell culture, biochemical assays, and clinical diagnostics. It is important to note, however, that the durability of a glass pipette depends on its handling and storage. It is essential to avoid exposing it to extreme temperatures or pressure, as this can lead to cracking. Moreover, it is essential to store glass pipettes upright to protect their tips and ensure proper air circulation.
Convenience
Glass pipettes are essential tools in various laboratory settings and are often used in tasks that require accurate liquid transfers, measurements, and mixing. They are typically made of borosilicate glass, which is a durable material that can withstand exposure to chemicals and other harsh solvents. They are also available in a range of capacities, allowing researchers to handle varying volumes of liquids according to their experimental requirements.
In addition, glass pipettes are chemically inert and do not react with the liquids they come into contact with. This feature makes them suitable for transferring sensitive samples that could be susceptible to contamination by reactive compounds. Moreover, they are easy to clean and sterilize, making them a cost-effective and sustainable option for labs.
Pipettes are available in a variety of shapes and sizes, including graduated pipettes that have increments along their tubes to indicate the volume they contain. Non-graduated pipettes do not have these markings and are designed to hold a fixed volume of liquid. They are also available in a wide range of materials, including glass Pasteur pipettes that can be used for precision applications such as cell patching.
Compared to plastic alternatives, glass pipettes are more reliable and durable, as they are less likely to melt or warp under high temperatures. However, they can be time-consuming to use, as they must be properly cleaned and sterilized after each use. This can be a drawback in applications that demand speed and efficiency, such as high-throughput screening or time-sensitive experiments.
Glass pipettes are available in a wide range of capacities, ranging from a few microliters to milliliters. They are primarily used in chemistry laboratories, where they are needed for precise volumetric analysis. They are also commonly used in the pharmaceutical industry for drug production and quality control processes. However, PIs should keep in mind that glass pipettes are not recommended for BSL2 and higher containment laboratories. In case a PI wishes to use them in these labs, they should submit a deviation request to the IBC with scientific justification.
While programmable pipette pullers can reliably produce pulled glass pipettes with the desired shaft length, tip diameter, and shape, they are expensive to own and operate. This can make it difficult for electrophysiological laboratories to repurpose them for delivering vectors or cells into the brain, which is a common application of pulled glass pipettes.
Drywall Repair Tips
Small holes from nail pops, screws, dings, and other minor blemishes can often be spackled and smoothed without much trouble. However, repairing more significant damage takes time and skill.
Choosing the right type of drywall compound, using self-primed spackle, and taking steps to ensure that your repair matches the rest of your wall are important. A professional can help you with these and other drywall repair tips. Contact Drywall Repair Las Vegas now!

Drywall is the most common wall surface in homes, and cracks are not uncommon. Cracks are often minor and do not pose a structural threat, but they can be unsightly and sometimes require professional attention. In some cases, they indicate a larger problem that needs to be addressed immediately, such as a leaking roof or foundation settlement.
Cracks in drywall can be caused by a number of factors, including normal settling, water damage, improper installation and handling, and stress from weather changes and soil moisture content. In many cases, the cracks are cosmetic and can be repaired with spackle or drywall compound.
Before attempting any repairs, make sure the area is clean and free of dust, cobwebs and other debris. This will help the repair compounds adhere to the wall. Then, if the crack is on a horizontal seam or a corner, use a utility knife to widen the gap to expose the tape and studs. Carefully remove the loose tape and scrape down to bare drywall where necessary. Apply a thin coat of drywall compound over the exposed drywall and studs. Allow the compound to dry and then sand the area with medium-grit sandpaper. Then, re-apply a thin coat of compound and sand again until the surface is smooth.
Leaking is the most common cause of drywall cracks. Even small leaks can lead to mold growth and other serious problems that may require professional attention. It is also important to act quickly whenever there is a sign of water damage, and use strong fans to dry wet spots of sheetrock before the problem escalates.
Another source of drywall cracks are shrinkage, expansion and contraction in the building materials, and movement in the home itself. Uneven heating and cooling can cause drywall to shrink or expand, and repeated cycles of expansion and contraction can eventually lead to cracking. Extreme weather, such as severe heat or cold and heavy winds can also cause drywall to crack. And finally, stress from shifting soil and foundation settlement can cause the drywall to crack at specific points in the house.
Holes
Small holes and dents can be repaired quickly with drywall compound and a putty knife. It’s a good idea to buy a gallon tub of drywall compound and a roll of paper tape (you may also want to pick up a sanding sponge). It’s best to work in thin layers, allowing each coat to dry before applying the next. This makes for a more durable and professional-looking repair.
Before cutting into a wall, it’s important to know where all the pipes and wires run, so you don’t damage them when you make your cuts. A flashlight will help you see if there are any electrical wires or plumbing lines running through the wall.
If the hole is smaller than a nickel, you can often just fill it with spackle or joint compound and smooth out the area, blending the edges with the rest of the wall. Use a bit of hand-sanding to remove any rough spots, and then lightly sand again once the filler has dried.
For larger holes, you need to do a bit more work and add a bridging material. If you have a patch kit designed for the type of hole you are fixing, follow the instructions included with the kit. Otherwise, you can make a simple patch using the same technique used to make small drywall repairs:
Start by making sure that the hole is clean and free of loose gypsum. Then cut a piece of patch tape that will overlap the hole by at least 1 inch on all sides. Peel the paper backing off and press it in place over the hole.
Holes larger than a nickel require a little extra effort because of the amount of shrinkage that occurs as drywall compound dries. It’s a good idea to use a bit of drywall mesh tape for strength, especially on long cracks.
If you’re working with a large hole, you can also reinforce it by screwing in wooden boards to the back of the drywall that extends beyond the hole. This method is better than trying to force a patch to hold in a hole that’s too big for the original drywall.
Sagging Ceilings
A sagging ceiling can be a serious safety hazard that requires professional help. Often, it is the result of water damage or structural problems. Luckily, there are practical preventive measures homeowners can take to minimize the risk of such issues.
Typically, minor blemishes such as indentations, abrasions, and small holes do not require patching. In these cases, it is usually possible to touch up the repair with a dab of spackle and interior paint. However, if the damage is more severe, it may be necessary to repaint the entire wall to blend in the repair. Regardless of the type of drywall repair, it is important to prime the surface first, as unprimed compound will absorb the color and sheen of the paint.
Water damage and leaks are the most common causes of sagging drywall ceilings. Undetected leaks from upstairs bathrooms, for example, can cause a ceiling to warp and weaken over time. Unless these issues are addressed, the ceiling may continue to sag or even collapse.
Other common causes of sagging ceilings include improper construction and the use of the wrong type of drywall. Homes constructed with drywall that is too light can easily sag over time.
Sagging ceilings can also be caused by long-term vibrations and disturbances. These can affect the strength of a ceiling, especially in areas with rolling garage doors or nearby train stations.
The solution to sagging ceilings is the same as with cracks and holes. Adjustable support jacks can be used to temporarily prop up the sagging section of the ceiling until it is repaired. After the ceiling is fixed, it should be removed the jacks one at a time to ensure that the new structure is strong enough to support itself without assistance.
While sagging ceilings can be a major safety hazard, they are also relatively simple to fix with the right tools and know-how. While the problem is certainly more complex than dealing with cracks or holes, a sagging ceiling should never be ignored. By addressing these problems promptly, home owners can save money and avoid further damage to their homes.
Painting
When the drywall repair is complete and the patched areas are smooth, it’s time to paint! With the right techniques and tools, painting over your drywall repairs can be fast and simple. This is a great way to get your home back to normal quickly and at a low cost.
For the best results, you’ll need to choose your paint carefully. Ensure that it’s formulated to adhere to drywall surfaces and is compatible with the type of drywall you have in your home. This will help to ensure that your paint job looks smooth and professional.
If you’re repainting an entire room, you may want to choose an eggshell or satin finish that will hide imperfections and provide a smooth surface for your interior painting contractors to work on. If you’re simply touching up nail holes or small blemishes, you can use a semi-gloss or sheen to cover them up and still have a polished look.
Once your walls are ready for paint, be sure to clean them thoroughly to remove any dirt or dust. Then, sand the drywall and taped areas to smooth them out. A light sanding will also help to remove any bumps or ridges that might stand out when the paint is applied. Once the sanding is done, apply a coat of primer and let it dry completely.
Drywall repair is a big project that can be intimidating for do-it-yourselfers. But if you’re willing to put in the time and effort, you can save yourself a lot of headaches in the long run by taking the time to repair your drywall. Whether it’s fixing tiny nail holes or a major crack, these drywall repair tips will help you finish your home improvement projects like a pro!
For larger holes in your drywall, you can either fill them with a pre-mixed or mix-it-yourself drywall compound. Be sure to smooth the compound over the hole and around the edges, and then sand it until it’s smooth and undetectable. If you’re not happy with the outcome, you can always apply a second coat and repeat the process until you achieve the desired result.